Installation - Manual
Installing MineColonies Mod on your original Minecraft Launcher
This process is for installing only the MineColonies mod in your original Minecraft launcher. You will not be able to connect to the MineColonies Official Servers due to the servers having a balanced variety of other mods as well.
For connecting to the official server, install GDLauncher or the Curseforge Launcher. You can visit the CurseForge site for a zip file containing all mods (with the correct versions) we are currently using on the official server, as well as all the appropriate configs, scripts, and the server.dat file for our modpack official server. If all these additional mods, configs, scripts, and the server.dat are downloaded and installed manually, you will be able to connect to our official server.
Installation of the MineColonies mod is very simple. It does require Minecraft Forge to be able to integrate mods into the Minecraft game, though.
We cannot offer support on the installation of Minecraft Forge, however, there are many excellent (and more in-depth) tutorials online. Just Google 'how to install minecraft forge' to find some.
Download Forge
Go to the Minecraft Forge Download page and download the latest version's installer (not the recommended version).
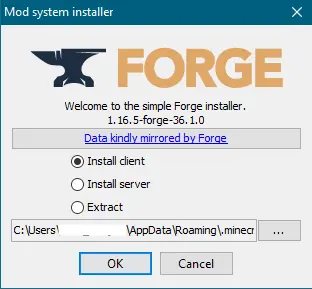
Run Forge Installer
Run the downloaded version and make sure it's on Install Client (or Server if you plan to run a Minecraft server). The installation path is preset according to Minecraft's standard installation path. If you have it installed in a different directory, change the installation directory. When it's done installing, you will see a complete message.

Download MineColonies
Go to the MineColonies CurseForge Download page site and download the latest 1.16.5 alpha version of MineColonies.
Navigate to Mods Folder
On your computer, go to the .minecraft/mods folder. To be able to find this folder, just click on the start button and in the search box type: %appdata% and hit "search". It will open the folder where you can find the .minecraft folder. Open this folder and inside you will find the mods folder.
Copy MineColonies to Mods
Once you are in the .minecraft/mods folder, copy the downloaded MineColonies file you downloaded in the Download MineColonies step and paste it here. Note: DO NOT extract the file if the option appears. Just put the .jar file in here without extracting its contents.
Do the Same Thing for Structurize
Follow the last three steps, except for Structurize (which MineColonies needs to work). Find the download page for Structurize here.
MineColonies doesn't always accept the latest version of Structurize. To ensure you have the required version, first, click on the MineColonies file name (on the Curseforge website). You'll be taken to the changelog, where it should say the accepted Structurize version at the top. Download that exact version.
Cannot Add Modpack Without External Installer
If you are adding the entire modpack to be able to play on the official server, you will require an external launcher to download the pack. The Curseforge launcher works on Windows or macOS. Other options include GDlauncher or MultiMC, both offering Windows, macOS and Linux support. Finally, if you can not or do not wish to 'install' a launcher you can use CMPDL that will run a small Java program to download the required modpack.
Unfortunately, manually 'installing' modpacks is no longer an option as Curseforge no longer distributes mods in the downloaded zip files for modpacks due to licensing issues.
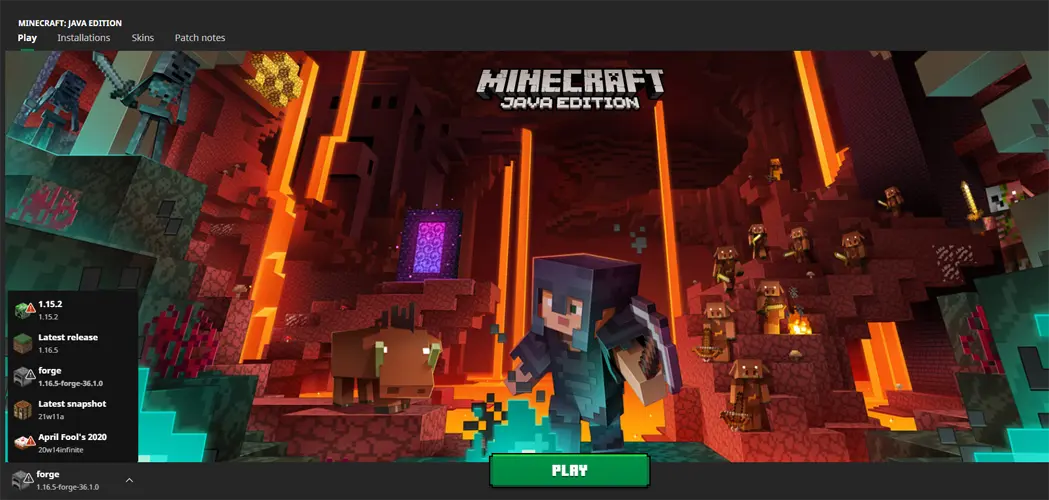
Run Minecraft and Select Profile
Run your original Minecraft launcher. Make sure you have the Forge profile loaded and hit play. (You might need to go to Installations and create a new installation first.)
That's it. If you followed these steps, you are ready to play MineColonies!
If changes are needed or you think there is content missing, feel free to edit this page or submit an issue for us to make edits. - MineColonies Wiki Team