Schematics
Schematics
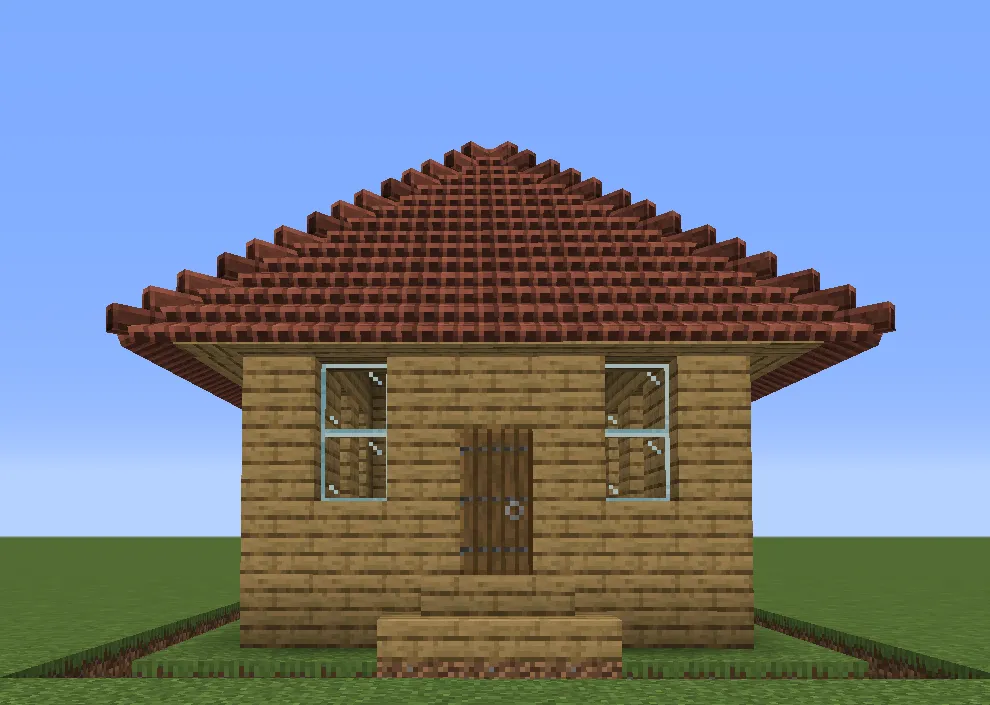
Schematics are files containing block and entity information of an area scanned with the Scan Tool Scan Tool Scan Tool Scan Tool Scan Tool Scan Tool Scan Tool Scan Tool Scan Tool Scan Tool Scan Tool Scan Tool Scan Tool Scan Tool Scan Tool Scan Tool Scan Tool in-game. You can scan any building or structure you like in singleplayer or multiplayer and then have your Builder Builder Builder Builder Builder Builder Builder Builder Builder Builder Builder Builder Builder Builder Builder Builder Builder build it for you, provided you supply the required materials.
A Schematic World
While you can build and scan schematics in any world, it's strongly recommended to create a separate creative world to design and build them, separate from your regular colony worlds. It's also often easier to design and build in single-player, though you can of course do it on a server if you want to collaborate with others. It's also recommended to do your builds outside of any existing colony (typically you would not create any colonies at all in that world) and even to disable mobs/weather/ticks to reduce disturbance of your builds.
If you're designing a full style pack, then on the Discord server you can find a player-created world download that contains build "pads" for most of the building types, along with a command-block-based auto-scanning system to help speed things up, though of course you can do things a different way if you prefer.
Several configuration settings are relevant to schematics. See the configuration page for details.
blueprintbuildmode(MineColonies): makes designing schematics easier without needing a colonyallowPlayerSchematics(Structurize): controls whether players can use their own scanned decorations on a servermaxCachedSchematics(Structurize): limits how many player schematics the server keeps at onceignoreSchematicsFromJar(Structurize): disables built-in schematics entirely
If you're a Patreon member, you have access to the official schematic server, and can request a plot area to make your own blueprints there, which may be useful if you want to collaborate with other Patreons.
Scanning a New Structure
Once you have a structure or area you want to scan to have your Builder Builder Builder Builder Builder Builder Builder Builder Builder Builder Builder Builder Builder Builder Builder Builder Builder build, you need to determine the exact area that needs to be scanned.
If the area you want to scan contains multiple anchor blocks (hut blocks, Tag Anchor Block Tag Anchor Block Tag Anchor Block Tag Anchor Block Tag Anchor Block Tag Anchor Block Tag Anchor Block Tag Anchor Block Tag Anchor Block Tag Anchor Block Tag Anchor Block Tag Anchor Block Tag Anchor Block Tag Anchor Block Tag Anchor Block Tag Anchor Block Tag Anchor Block , or Decoration Controller Decoration Controller Decoration Controller Decoration Controller Decoration Controller Decoration Controller Decoration Controller Decoration Controller Decoration Controller Decoration Controller Decoration Controller Decoration Controller Decoration Controller Decoration Controller Decoration Controller Decoration Controller Decoration Controller ; also including some special blocks like the Stash Stash Stash Stash Stash Stash Stash Stash Stash Stash Stash Stash Stash Stash Stash Stash Stash ) you should shift-left-click the correct anchor block (e.g. the Barracks Barracks Barracks Barracks Barracks Barracks Barracks Barracks Barracks Barracks Barracks Barracks Barracks Barracks Barracks Barracks Barracks hut block in a Barracks Barracks Barracks Barracks Barracks Barracks Barracks Barracks Barracks Barracks Barracks Barracks Barracks Barracks Barracks Barracks Barracks schematic) first, before selecting corners.
Using the Scan Tool Scan Tool Scan Tool Scan Tool Scan Tool Scan Tool Scan Tool Scan Tool Scan Tool Scan Tool Scan Tool Scan Tool Scan Tool Scan Tool Scan Tool Scan Tool Scan Tool , left-click on the bottom-left corner of your blueprint.
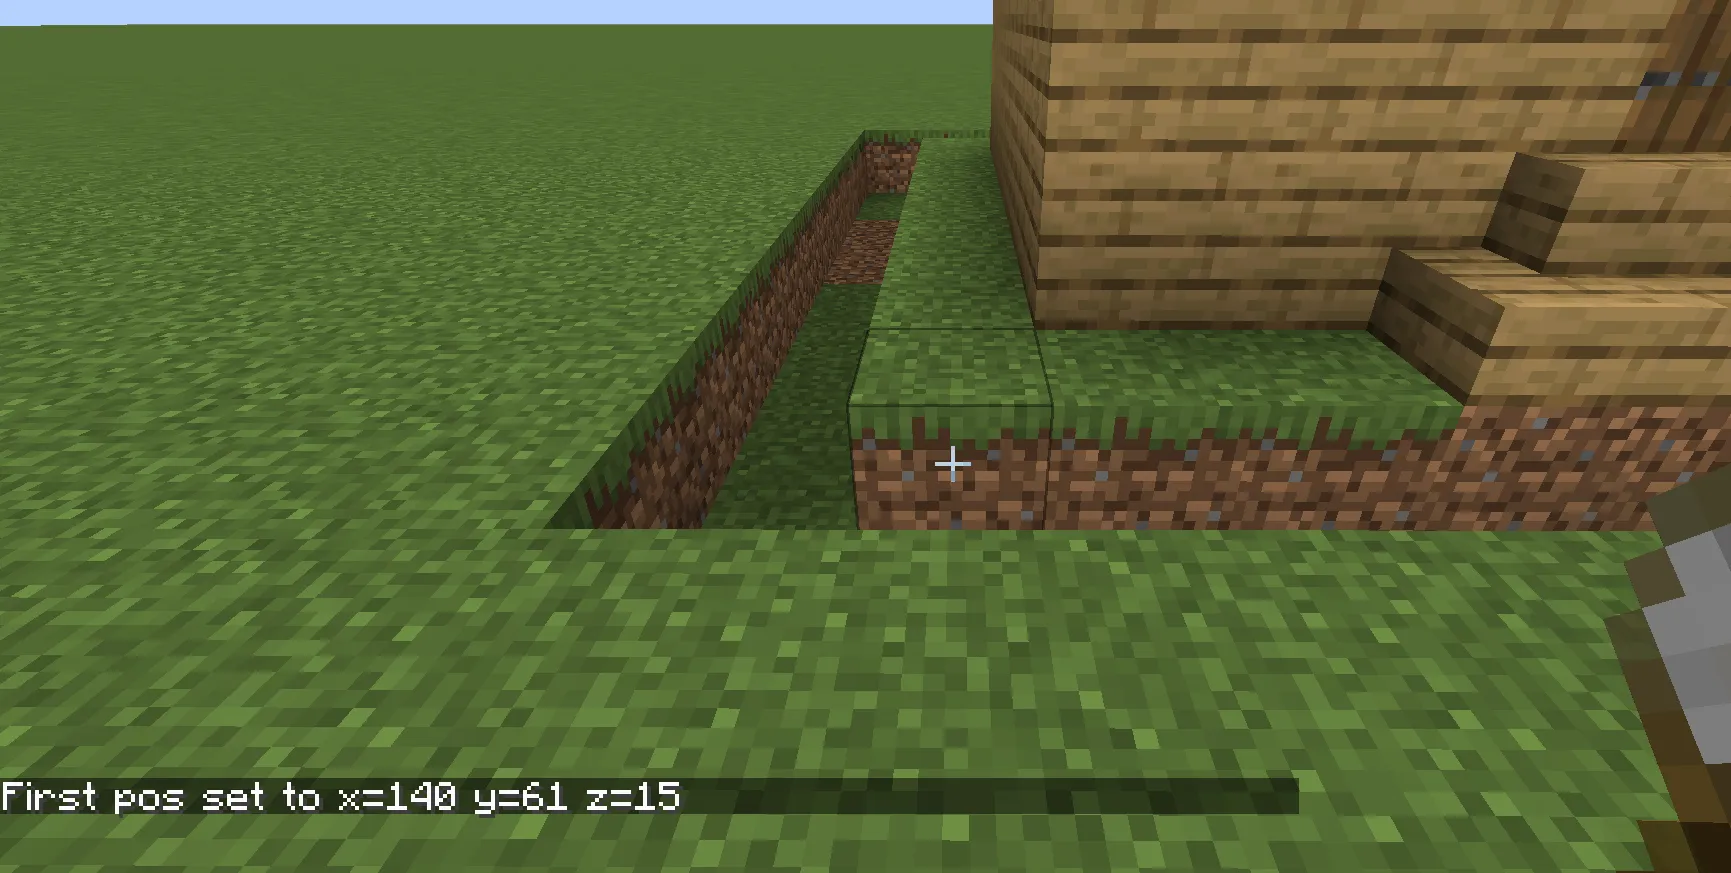
Next, right-click on the top-right corner of your blueprint. It's often helpful to place a Placeholder Block Placeholder Block Placeholder Block Placeholder Block Placeholder Block Placeholder Block Placeholder Block Placeholder Block Placeholder Block Placeholder Block Placeholder Block Placeholder Block Placeholder Block Placeholder Block Placeholder Block Placeholder Block Placeholder Block there so that you have something convenient to click on, without disturbing your actual build.
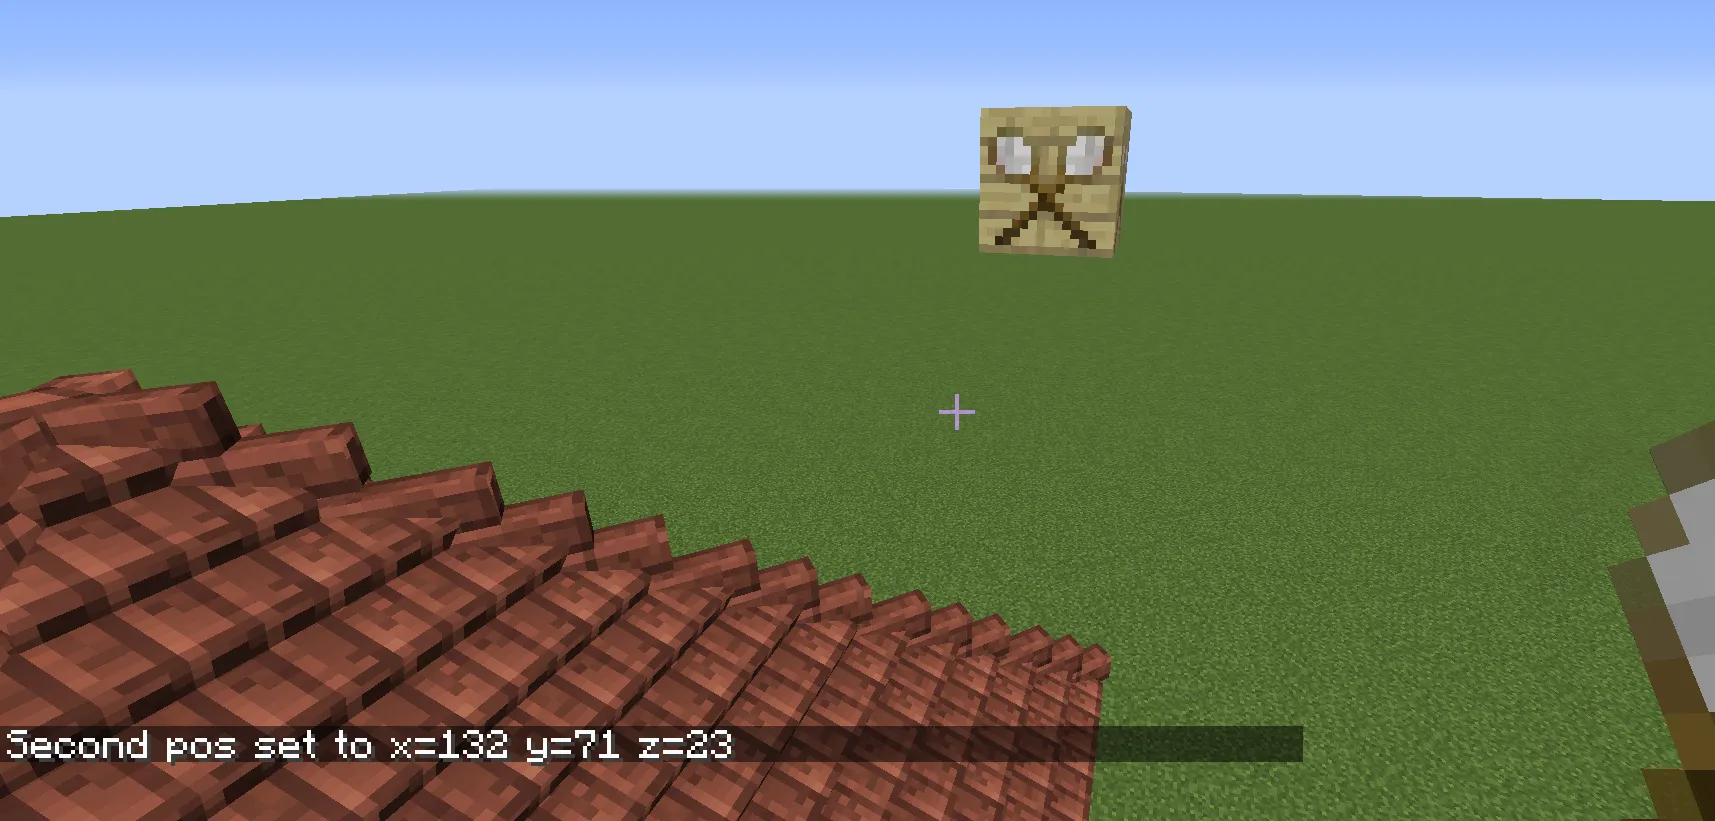
Then click in the air to see the entire structure.
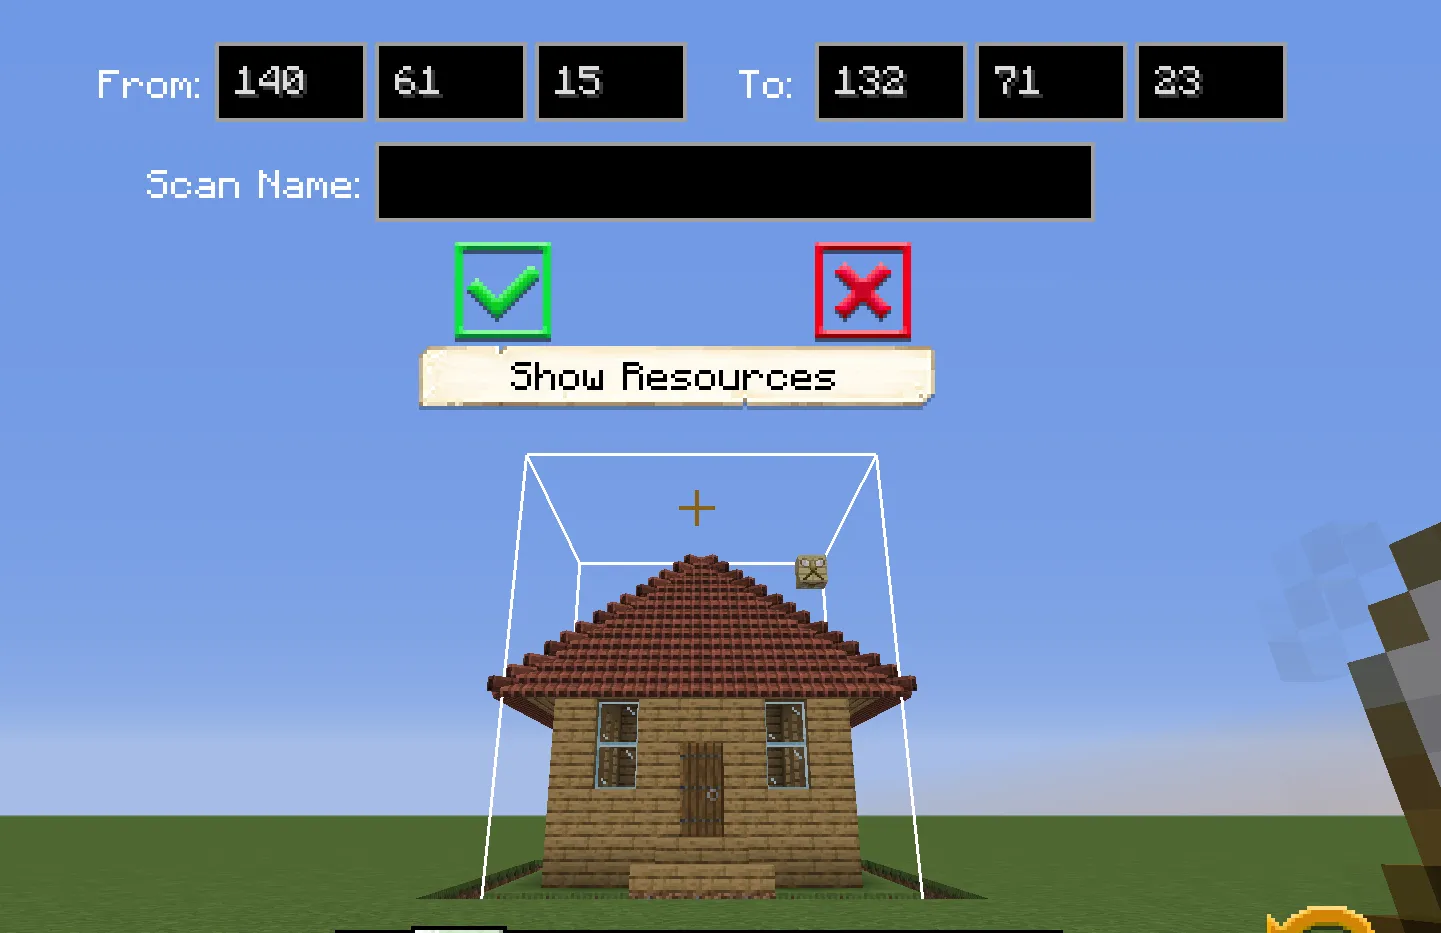
Once you have the full area set, press Escape and the white outline will stay in place. Go around it to double-check that everything you want is included. When ready, right-click in the air again to open the GUI, enter your scan name, and press the green checkmark to save.
Note:
- Do not rename the file after scanning. It must be scanned with the correct name.
- If your structure contains two or more anchor blocks, you must sneak left-click the intended anchor before selecting corners.
- Hut buildings use the associated hut block as the anchor. Upgradable decorations should use the Decoration Controller Decoration Controller Decoration Controller Decoration Controller Decoration Controller Decoration Controller Decoration Controller Decoration Controller Decoration Controller Decoration Controller Decoration Controller Decoration Controller Decoration Controller Decoration Controller Decoration Controller Decoration Controller Decoration Controller as the anchor. Non-upgradable decorations should use the Tag Anchor Block Tag Anchor Block Tag Anchor Block Tag Anchor Block Tag Anchor Block Tag Anchor Block Tag Anchor Block Tag Anchor Block Tag Anchor Block Tag Anchor Block Tag Anchor Block Tag Anchor Block Tag Anchor Block Tag Anchor Block Tag Anchor Block Tag Anchor Block Tag Anchor Block as the anchor. If you want a non-upgradable decoration to act as a leisure site, you must use a Decoration Controller Decoration Controller Decoration Controller Decoration Controller Decoration Controller Decoration Controller Decoration Controller Decoration Controller Decoration Controller Decoration Controller Decoration Controller Decoration Controller Decoration Controller Decoration Controller Decoration Controller Decoration Controller Decoration Controller , as only those are selected as leisure sites.
Scans are saved in ../minecolonies/scan/new/....
Once the scans are saved, they need to be moved to the ../structurize/schematics/(folder)/file if they are a custom hut.
Scans are saved in */blueprints/<yourplayername>/scans.
Once the scans are saved, they need to be placed in a style pack, preferably in the correct folder. See the Style Packs page for more details.
Placing a Schematic
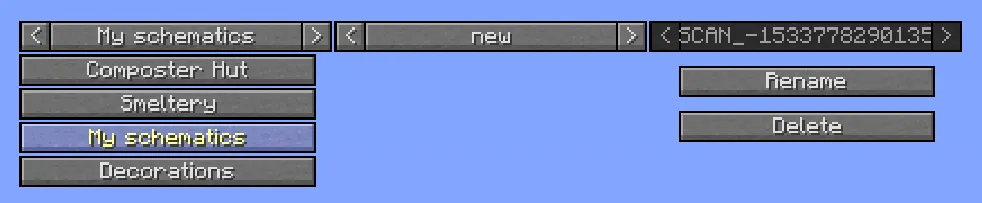
Once you have scanned a structure, you can use the Build Tool Build Tool Build Tool Build Tool Build Tool Build Tool Build Tool Build Tool Build Tool Build Tool Build Tool Build Tool Build Tool Build Tool Build Tool Build Tool Build Tool to have your Builder Builder Builder Builder Builder Builder Builder Builder Builder Builder Builder Builder Builder Builder Builder Builder Builder build it for you. Once you right-click with the build tool, you will have to select "My Schematics" (in the left dropdown menu) and on the right dropdown menu you will see the scans that you have made. There is also a Rename button where you can change the name of the scan. You can also delete any of your saved scans.
The scanned structure can be found in the Build Tool Build Tool Build Tool Build Tool Build Tool Build Tool Build Tool Build Tool Build Tool Build Tool Build Tool Build Tool Build Tool Build Tool Build Tool Build Tool Build Tool under the style pack with your own name. Click "Switch Pack" -> "<yourplayername>" (icon looks like the Scan Tool Scan Tool Scan Tool Scan Tool Scan Tool Scan Tool Scan Tool Scan Tool Scan Tool Scan Tool Scan Tool Scan Tool Scan Tool Scan Tool Scan Tool Scan Tool Scan Tool ) -> "scans".
Frequently Asked Questions
Q: How do I install custom schematics I just downloaded?
A: Those custom schematics go in
*/structurize/schematics. Unzip the file you downloaded and put all subfolders into the schematics folder. It should contain folders like the style name, decorations, walls, supplycamps, etc. (depending on which style you installed).A: The style pack goes in the
blueprintsfolder. Unzip the file and find the folder containingpack.json(either the unzipped folder itself, or a folder directly under it, depending on how the zip was made). Place that folder directly insideblueprints, not in any subfolder. You should end up with paths likeblueprints/onestyle/pack.json,blueprints/anotherstyle/pack.json, etc.In singleplayer this is sufficient. On a multiplayer server, it depends on the
allowPlayerSchematicsStructurize config option. If it is enabled, the server will accept schematics uploaded by clients and a client-side installation is enough. If it is disabled (the default), the pack must be installed in the server'sblueprintsfolder by the server admin. Installing only on the client when this option is off means you will see the schematic in the build tool, but the Builder Builder Builder Builder Builder Builder Builder Builder Builder Builder Builder Builder Builder Builder Builder Builder Builder will not be able to build it.
Q: What and where is the scans folder?
A: The scans folder is where schematics are saved after performing a scan with the Scan Tool Scan Tool Scan Tool Scan Tool Scan Tool Scan Tool Scan Tool Scan Tool Scan Tool Scan Tool Scan Tool Scan Tool Scan Tool Scan Tool Scan Tool Scan Tool Scan Tool .
This is a client-side directory located in your Minecraft folder under
*/structurize/scans/. Freshly scanned schematics appear in*/structurize/scans/new/unless renamed in-game. (If they aren't there, check*/minecolonies/scans/new.) This directory is shared between all your singleplayer and multiplayer games.This is located in your own style pack under
*/blueprints/<yourplayername>/scans/. This folder is shared between all your singleplayer and multiplayer games.
Q: Where is the schematic folder?
A: The schematic folder is where custom schematics are placed so the game can load them.
For both singleplayer and multiplayer, this is
*/structurize/schematics/.Custom schematics need to be placed in a style pack. See the Style Packs page for details.
Q: I have a folder with a long UUID in its name under minecolonies/cache, what is that for?
A: This is a server-side cache folder used to sync schematics between the server and players.
The server sends schematics to players so the build tool preview works. These are cached under
*/structurize/{ServerUUID}/cache/and can be safely deleted; they are re-created automatically when needed.The server sends schematics to players for the build tool preview. This cache can be safely deleted; it is re-created automatically when needed.
This was previously used to cache schematics sent from a server. It is no longer needed in 1.19.2 and later and can be safely deleted.
Q: What is the blueprints/clients folder on my server?
A: This folder holds a cached copy of the decorations and shapes used by your players, possibly including style packs they have installed themselves. Note that players cannot use these to build functional buildings; those must be installed properly on the server.
You can delete these folders at any time (preferably while the player is not logged in); they will be re-created as needed.
Q: Can I just build my own buildings and get the colonists to move in?
A: No. Functional buildings must be constructed by the Builder Builder Builder Builder Builder Builder Builder Builder Builder Builder Builder Builder Builder Builder Builder Builder Builder . You must either use prefabs from an existing style pack, or design your own custom huts in a separate creative world first. MineColonies is more like an RTS than classic Minecraft building.
Further Help
The #schematic-design channel in the Discord is the best place to ask questions about designing your own schematics.
If changes are needed or you think there is content missing, feel free to edit this page or submit an issue for us to make edits. - MineColonies Wiki Team