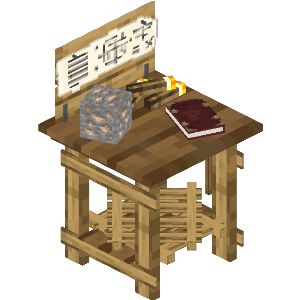
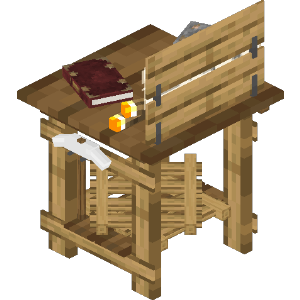
Mine
The
At the
The
These mining levels are based on the ores you can find there most:
| Ore | Y-level |
|---|---|
| Copper | 48 |
| Iron | 16 |
| Gold | -16 |
| Diamond | Bedrock |
To give some examples: If the
- Level 1 can dig down to Y 48
- Level 2 can dig down to Y 16
- Level 3 can dig down to Y -16
- Etc
If the
- Level 1 can dig down to Y 16
- Level 2 can dig down to Y -16
- Level 3 can dig down to bedrock
Once the main shaft is completed, the
At the
The
While mining, sometimes the
Note: When the
MinerMinerMinerMinerMinerMinerMinerMinerMinerMinerMinerMinerMinerMinerMinerMinerMinerencounters air whilst building the shaft downwards, they don't make platforms there, as they think they encountered a cave. In particular, that means you should not help them with mining. Even though they skip platforms, they still check the Y-level against the depth threshold and stop digging down if they aren't allowed to dig down further.
Note: Placing the
MineMineMineMineMineMineMineMineMineMineMineMineMineMineMineMineMinehut below the maximum Y level it can mine will cause theMinerMinerMinerMinerMinerMinerMinerMinerMinerMinerMinerMinerMinerMinerMinerMinerMinernot work and complain the hut needs to be upgraded. To avoid this error, place the hut at least 4 blocks above the maximum depth for the hut level. If you want yourMineMineMineMineMineMineMineMineMineMineMineMineMineMineMineMineMineto be lower, you will need to upgrade it before theMinerMinerMinerMinerMinerMinerMinerMinerMinerMinerMinerMinerMinerMinerMinerMinerMinerwill work.
| Building Level | Shaft Y Level |
|---|---|
| 1 | 40 |
| 2 | 20 |
| 3 | 0 |
| 4 | Bedrock |
| 5 | " |
Interface
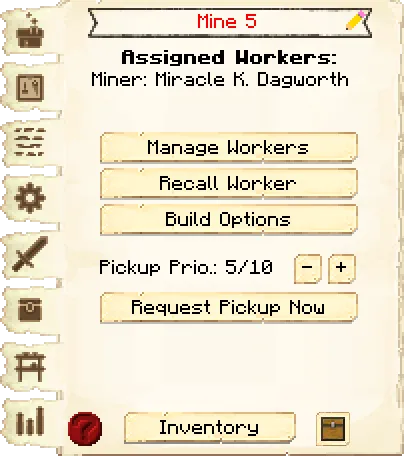
The first tab of the GUI is the main interface.
- Header:
- Building Name: Shows the name of the building, including the level of the building.
- Pencil: Allows you to rename the building. The level of the building will always be listed after the name.
- Assigned Workers: Tells you the workers assigned to this building.
- Controls:
- Manage Workers: Lets you change which workers are assigned to work at this hut. Note: this only works if you have turned the worker hiring mode, in the or in the hut itself, to manual, otherwise citizens will be hired automatically.
- Recall Workers: Recalls the workers at this building to the building. You might use it if they are stuck somewhere, you want to see what they have, or want to give them something directly.
- Build Options: Lets you create a build, upgrade, or repair build order for this hut. To learn more about the building system, please visit the page.
- Request System:
- Pickup Priority: You can set the priority that a will visit this hut and pick up items (when the worker at this hut issues a request), or you can tell to never visit this hut to pick up items. (For the pickup priority, 10 is the highest.)
- Request Pickup Now: You can click this button in order to tell any available to come and pick up all the items from the building
- Footer:
- Info Button: Some huts have an in-game guide. Press the ? button to access it.
- Inventory: Here you can access the hut block's storage, where the worker at this hut takes and deposits materials. They will also use any that were placed in the hut when it was built or upgraded, so be sure to check those as well!
- Chest Icon: Click this button to see all the items in the hut's storage (including the hut block's inventory and any racks that came with the hut). Clicking the ? button next to an item's count will highlight the storage container it's in.
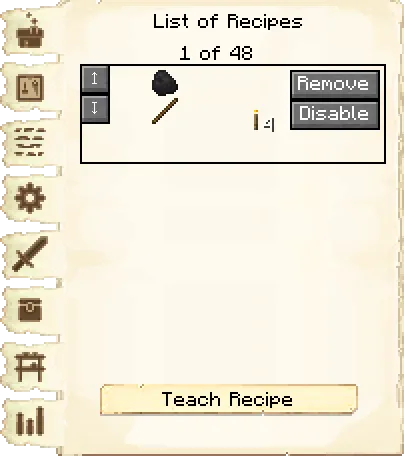
The second tab of the GUI is the crafting recipes.
Here you can see all the crafting recipes this building knows.
The arrows allow you to move them up or down in priority. You are also able to disable or remove specific recipes.
- Teach Recipe: When clicking teach recipe, it opens a crafting grid which allows you to teach this hut crafting recipes (not the worker).
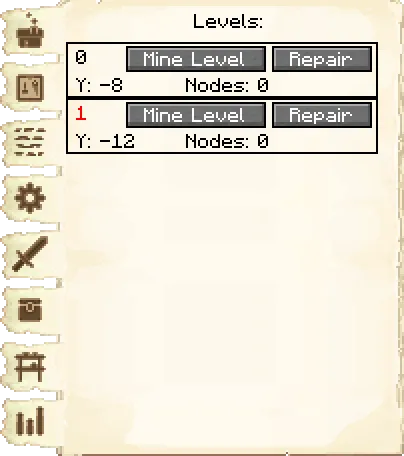
The third tab of the GUI is the levels.
The level refers to the platforms the
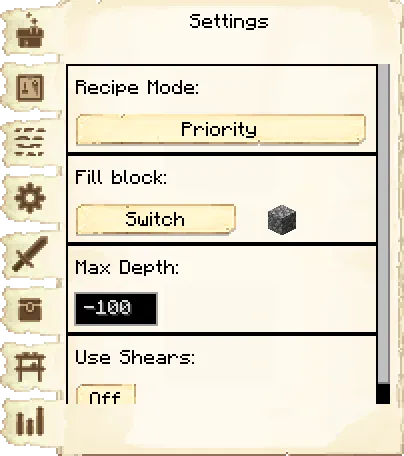
The fourth tab of the GUI is the settings.
- Recipe Mode: This is unlocked by researching in the . This changes how multiple recipes for the same item are prioritized.
- Priority: This is the default setting. The hut will try to use recipes that are higher up in their recipe list first.
- Warehouse Stock: The hut will look in the warehouse first to see what resource you have more of before deciding what recipe it will use.
- Fill Block: Here you can select what block the MinerMinerMinerMinerMinerMinerMinerMinerMinerMinerMinerMinerMinerMinerMinerMinerMineruses to fill in holes/gaps in the schematic. The default is the dirt block.
- Max Depth: Here you can overide the default maximum depth of the MineMineMineMineMineMineMineMineMineMineMineMineMineMineMineMineMine, if you don't want theMinerMinerMinerMinerMinerMinerMinerMinerMinerMinerMinerMinerMinerMinerMinerMinerMinerto dig as deep as theMineMineMineMineMineMineMineMineMineMineMineMineMineMineMineMineMinelevel allows. The default is -100.
- Use Shears: Whether the MinerMinerMinerMinerMinerMinerMinerMinerMinerMinerMinerMinerMinerMinerMinerMinerMinerwill use shears to break certain blocks.
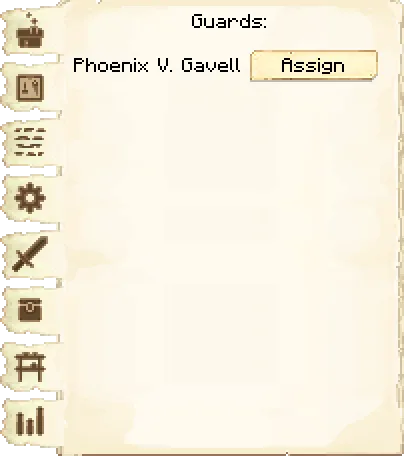
The fifth tab of the GUI is the guards.
Here is where you can assign guards to patrol this
Patrol Mine task will show up here; tasks can be set in the it's GUI ( do not have the Patrol Mine task).The amount of guards you can assign to the
| Building Level | Amount of guards |
|---|---|
| 1 | 1 |
| 2 | 1 |
| 3 | 2 |
| 4 | 2 |
| 5 | 3 |
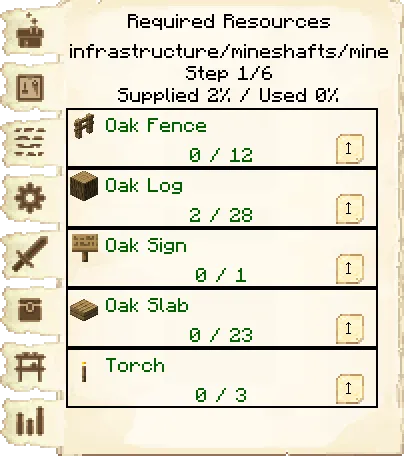
The sixth tab of the GUI is the required resources.
These are the resources that the worker will need for the workorder they are currently working on.
- Current project: The top line tells you which work order is being worked on and its level.
- Step: What step of the project the worker is on.
- Supplied % / Used %: How much of the needed resources are in the building inventory, and how many of the resources have been placed.
- Items: Each needed item is displayed, along with how many of that item is in inventory, and how many are needed.
These amounts will change as they place blocks and will show only what blocks the worker still needs to place. The block
in black are in their inventory. The blocks in red are the ones neither you nor the MineMineMineMineMineMineMineMineMineMineMineMineMineMineMineMineMinehas in their inventory. The blocks in green are ones you have in inventory but the builder needs. Clicking the up arrow next to the item will automatically remove that item from your inventory and place it into theMineMineMineMineMineMineMineMineMineMineMineMineMineMineMineMineMineits inventory.
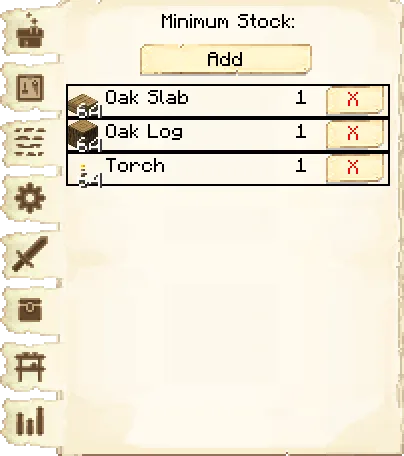
The seventh tab of the GUI is the minimum stock.
Use this button to tell the
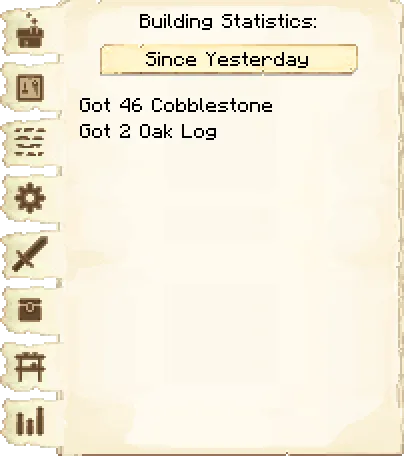
The eight tab of the GUI is the statistics.
Statistics are simple values like "X fish caught", "Y logs cut", "Z blocks mined", etc. You can switch between- Yesterday
- Last week
- Last 100 days
- All time
Mine

Recipes:
Research: No research is required for this building.
Worker: Miner
Mine
Recipes:
Research: No research is required for this building.
Worker: Miner
Mine

Recipes:
Research: No research is required for this building.
Worker: Miner
Mine
Recipes:
Research: No research is required for this building.
Worker: Miner
Mine
Recipes:
Research: No research is required for this building.
Worker: Miner
Mine
Recipes:
Research: No research is required for this building.
Worker: Miner
Mine
Recipes:
Research: No research is required for this building.
Worker: Miner
Mine
Recipes:
Research: No research is required for this building.
Worker: Miner
Mine
Recipes:
Research: No research is required for this building.
Worker: Miner
Mine
Recipes:
Research: No research is required for this building.
Worker: Miner
Mine
Recipes:
Research: No research is required for this building.
Worker: Miner
Mine
Recipes:
Research: No research is required for this building.
Worker: Miner
Mine
Recipes:
Research: No research is required for this building.
Worker: Miner
Mine
Recipes:
Research: No research is required for this building.
Worker: Miner
Mine
Recipes:
Research: No research is required for this building.
Worker: Miner
Mine
Recipes:
Research: No research is required for this building.
Worker: Miner
Mine
Recipes:
Research: No research is required for this building.
Worker: Miner
If changes are needed or you think there is content missing, feel free to edit this page or submit an issue for us to make edits. - MineColonies Wiki Team